- Home>
- .NET core>
- Automatically build and deploy .NET core 3 console application as a Windows service
Automatically build and deploy .NET core 3 console application as a Windows service
In this post, I want to share an example of using Azure Devops to automatically build and deploy a .NET console application as a windows service to run on a Windows VM.
Enable .NET core 3 app to run as a windows service
For this example, I have scaffolded a simple .NET core console application using Visual Studio. It is a very rudimentary app which logs out a message every minute until stop. You can generate a similar project using Worker Service Template as a starting point. You can checkout the codes for this project on my Github repo.
At the high level, to enable a .NET core app to run as a windows service, you need the following:
- You need to add the nuget package: Microsoft.Extensions.Hosting.WindowsServices
- Call
UseWindowsService()in Program.cs file, when creating the host builder. - Your service class need to implement
BackgroundServiceclass. - Register the service by calling the
AddHostedServiceextension method.
public static IHostBuilder CreateHostBuilder(string[] args)
        {
            return Host.CreateDefaultBuilder(args)
                .ConfigureServices((hostContext, services) =>
                {
                    services.AddHostedService<Worker>();
                })
                .UseWindowsService();
        }
To learn more about running .NET core 3 app as a windows service, checkout this article.
In order to run as a Windows Service we need our worker to listen for start and stop signals from
ServiceBasethe .NET type that exposes the Windows Service systems to .NET applications.
Build the app
I have also setup a CI pipeline to automatically build the artifact.
# Add steps that run tests, create a NuGet package, deploy, and more:
# https://docs.microsoft.com/azure/devops/pipelines/languages/dotnet-core

trigger:
- master

pool:
  vmImage: 'windows-latest'

variables:
  buildConfiguration: 'Release'

steps:
- script: dotnet build --configuration $(buildConfiguration)
  displayName: 'dotnet build $(buildConfiguration)'

- task: DotNetCoreCLI@2
  inputs:
    command: 'publish'
    publishWebProjects: false
    zipAfterPublish: true
    arguments: '--output $(Build.ArtifactStagingDirectory)'

- task: PublishBuildArtifacts@1
  inputs:
    pathToPublish: $(Build.ArtifactStagingDirectory)
    ArtifactName: ExNetCoreAppWinService
Notice in the above yaml codes, I set the value of ‘vmImage’ to ‘windows-latest’. You need to use a windows agent so that the artifact contains the .exe file which you need when registering the app as a windows service. If you select a different type of agent, e.g. ‘ubuntu’, the resulting artifact would not have a .exe file. When I tried to register the service, I pointed the path to the .dll file and got errors. It took me a few hours before I realized I had to point to the .exe file, which was missing because the agent I used to build the artifact was set to ‘ubuntu-latest’.
With the above pipeline, whenever new codes get checked in to the master branch, the build automatically runs and publishes an artifact named “MyNetCoreConsoleApp”.
Deploy the service
If you are familiar with Azure Devops, you may have seen it has templates for various types of deployment, yet it does not have a template to deploy an application as a Windows Service.
But no worry about it. We can configure a release pipeline to automatically deploy the application as a Windows Service with a bit of Powershell script. I assume you already have registered the VMs to a deployment pool and created a deployment group for your project . If you don’t know how, check out this post in which I cover deployment pool, deployment group and registering azure VMs to azure devops as part of configuring a release pipeline to automatically deploy an ASP.NET core application to IIS.
Below I show the setup of the release pipeline to automatically deploy the app as a windows service.
- Start the new Release pipeline with an Empty Job.
- Under Pipeline, click on Add to add an artifact.
- Select Build as Source Type.
- Under Source (build pipeline), select the build pipeline which produces the artifact folder which contains dll and the executable file.

- Click on the Tasks on the menu tab bar to view and add tasks.
We are going to run add a PowerShell script and have it run on the actual server where we deploy and install the app as a windows service.
- Remove Agent job as we don’t need to run anything on the agent.
- Add a deployment group job and configure it to run on the server where you want to deploy and install the app as a windows server. Your screen may look something similar to the screenshot below.

- Click the + button to search for and add a PowerShell task under Deployment group job.

- Configure the task:
- For Type, select Inline.
- For Working Directory, select the innermost directory which contains the artifact zipped file.
- Paste the following script under Script textbox, replace parameters according to how your namings.
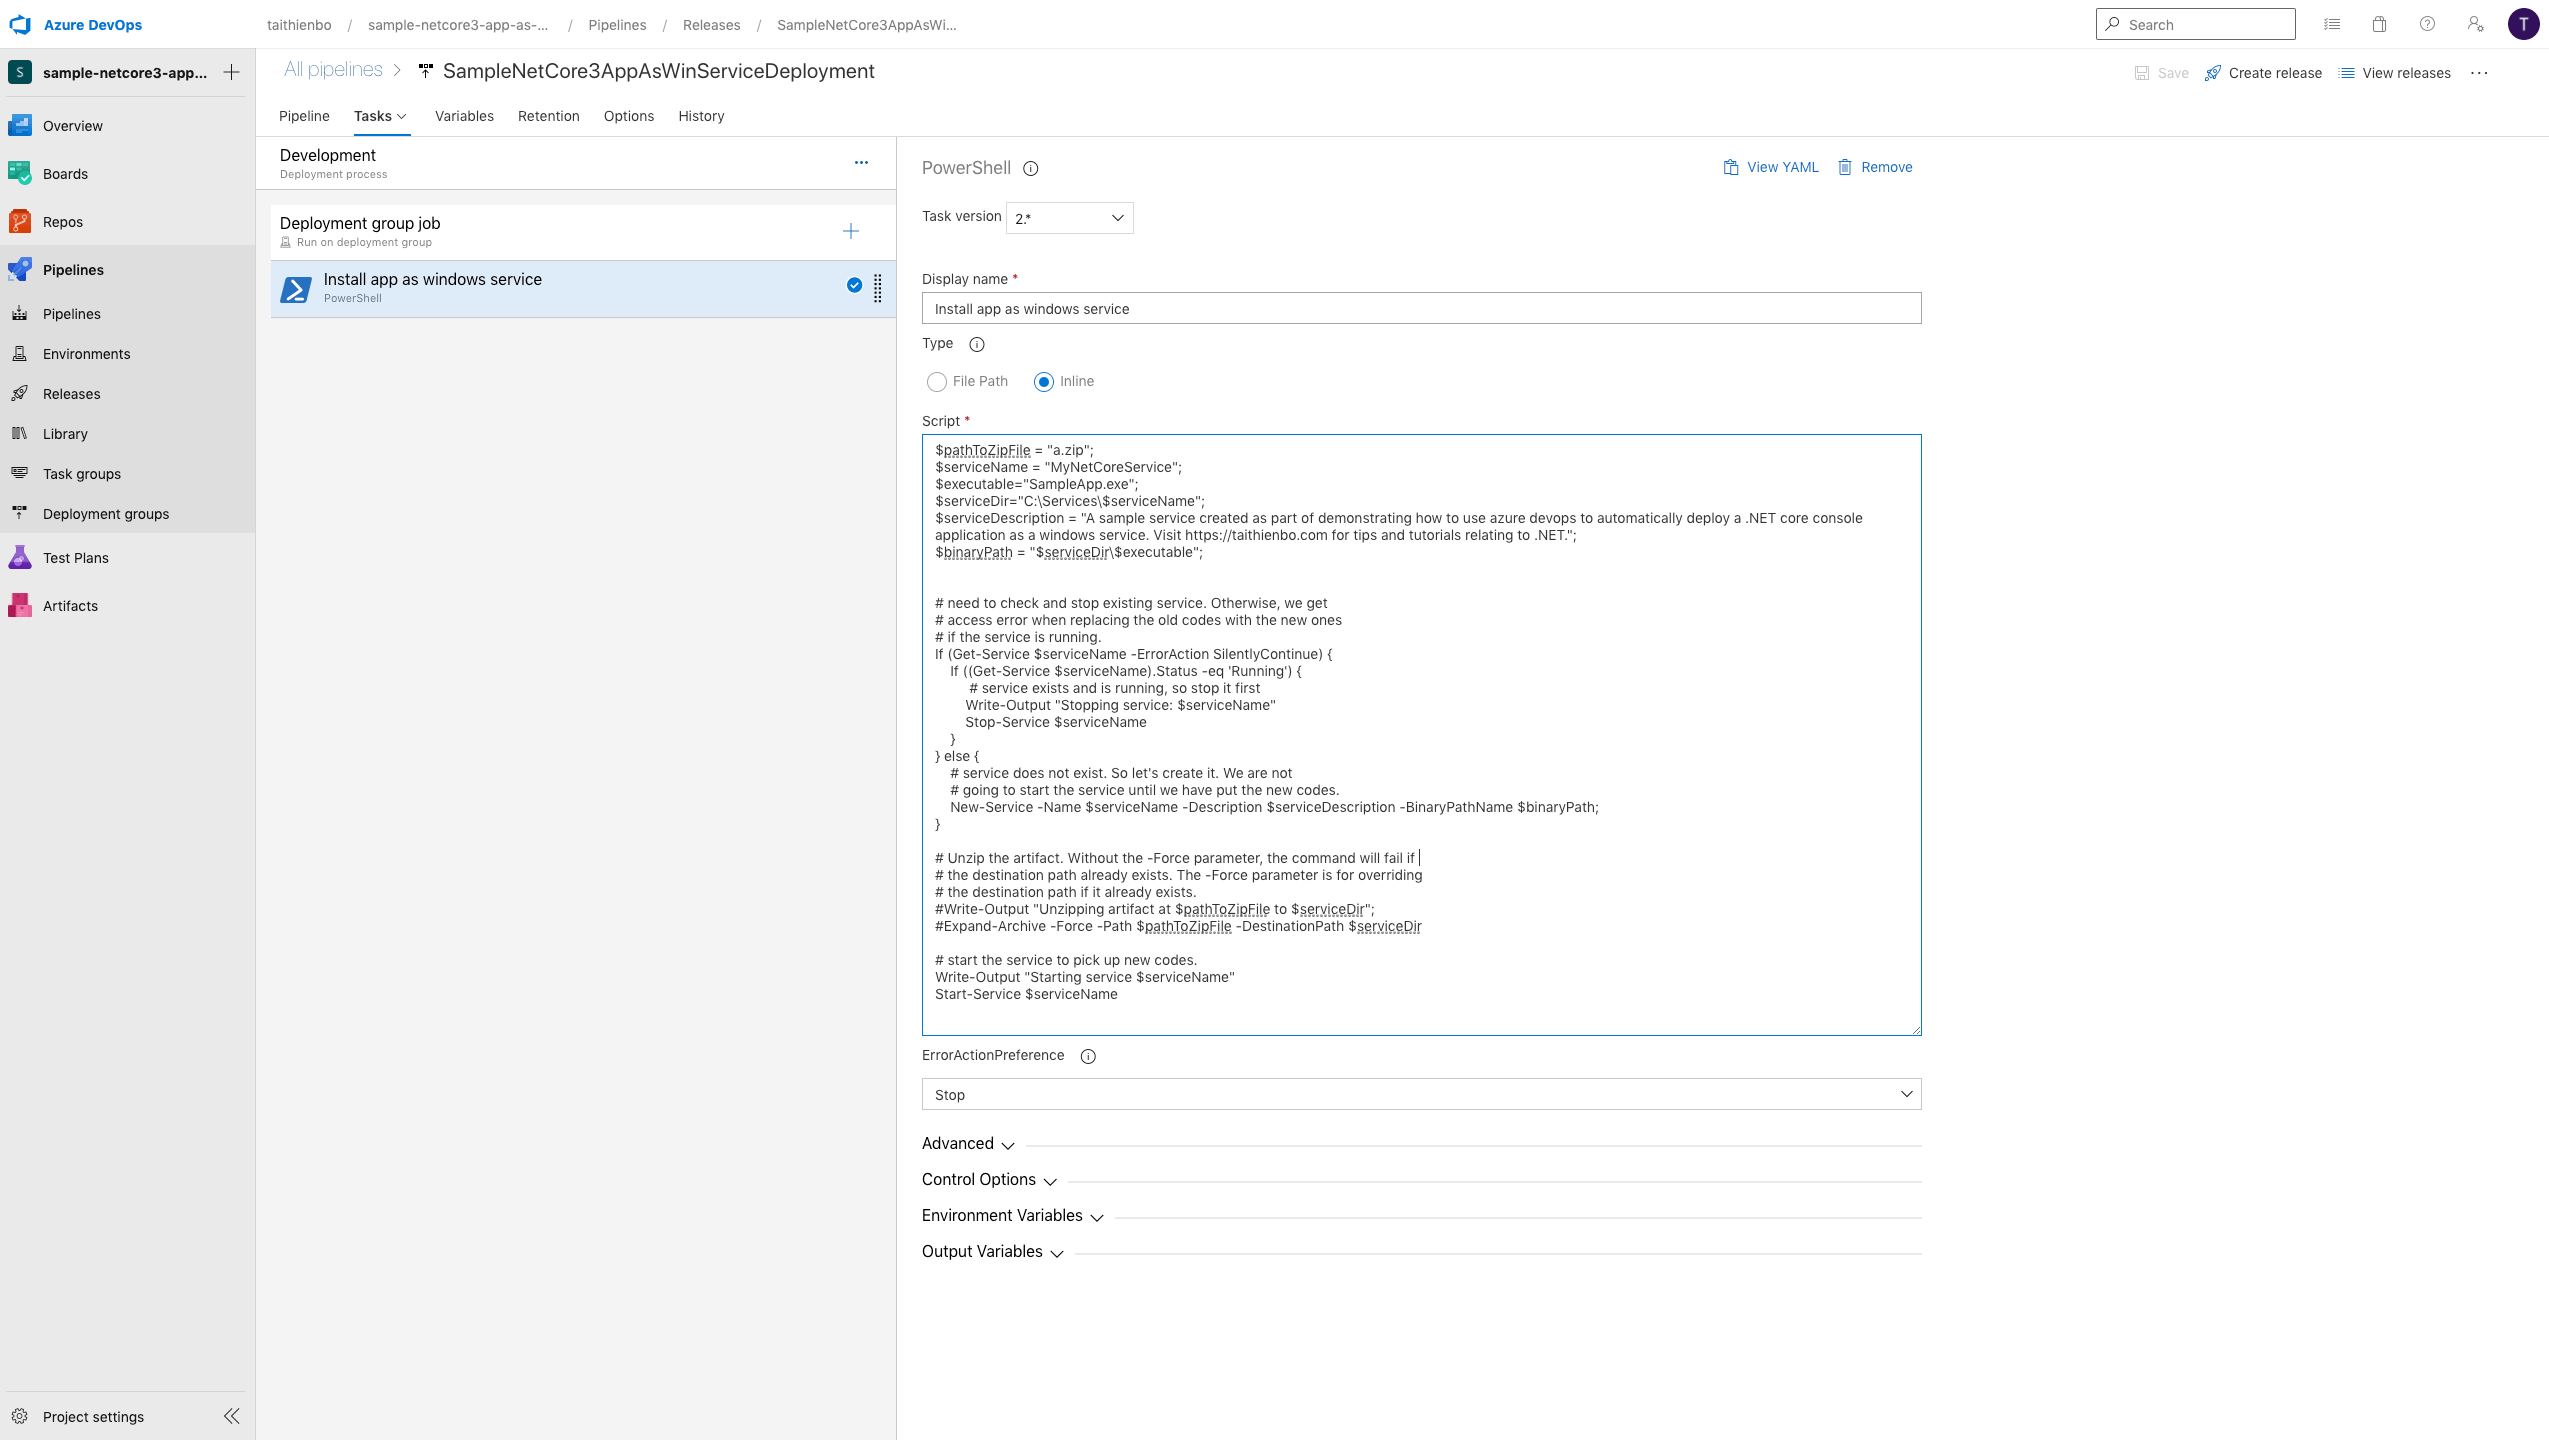
When you register the azure agent on the server, the registration creates a directory for the agent under the C drive. For example, on my azure Windows VM, this directory is C:\azagent. When the task runs, the azure agent downloads the artifact onto the server to a specific directory under this directory. For example, on my azure Windows VM, the task downloads the artifact to the folder c:\azagent\A1_work\r2\a. With the above setup, the script is going to be run under the the same directory.

For your convenience, below is the script
$pathToZipFile = "Name of your-artifact-zipped-file;
$serviceName = "your service name";
$executable="Name of the .exe file ";
$serviceDir="where you want to store the unzipped artifact files";
$serviceDescription = "Your service description";
$binaryPath = "$serviceDir\$executable";


# need to check and stop existing service. Otherwise, we get
# access error when replacing the old codes with the new ones
# if the service is running.
If (Get-Service $serviceName -ErrorAction SilentlyContinue) {
    If ((Get-Service $serviceName).Status -eq 'Running') {
         # service exists and is running, so stop it first
        Write-Output "Stopping service: $serviceName"
        Stop-Service $serviceName
    }
} else {
    # service does not exist. So let's create it. We are not
    # going to start the service until we have put the new codes.
    New-Service -Name $serviceName -Description $serviceDescription -BinaryPathName $binaryPath;
}

# Unzip the artifact. Without the -Force parameter, the command will fail if
# the destination path already exists. The -Force parameter is for overriding
# the destination path if it already exists.
#Write-Output "Unzipping artifact at $pathToZipFile to $serviceDir";
#Expand-Archive -Force -Path $pathToZipFile -DestinationPath $serviceDir

# start the service to pick up new codes.
Write-Output "Starting service $serviceName"
Start-Service $serviceName
That’s it. Let’s me know if you have any questions. Happy coding.
References
Create windows service from executable
Related Posts
Supporting Multiple Microsoft Teams Bots in One ASP.NET Core Application
Enhancing ASP.NET Core/Blazor App Security and Reusability with HttpMessageHandler and Named HttpClient
Web scraping in C# using HtmlAgilityPack
Building multitenant application – Part 2: Storing value into database session context from ASP.NET core web API
Common frameworks, libraries and design patterns I use
Build and deploy a WebJob alongside web app using azure pipelines
Authenticate against azure ad using certificate in a client credentials flow
Notes on The Clean Architecture
